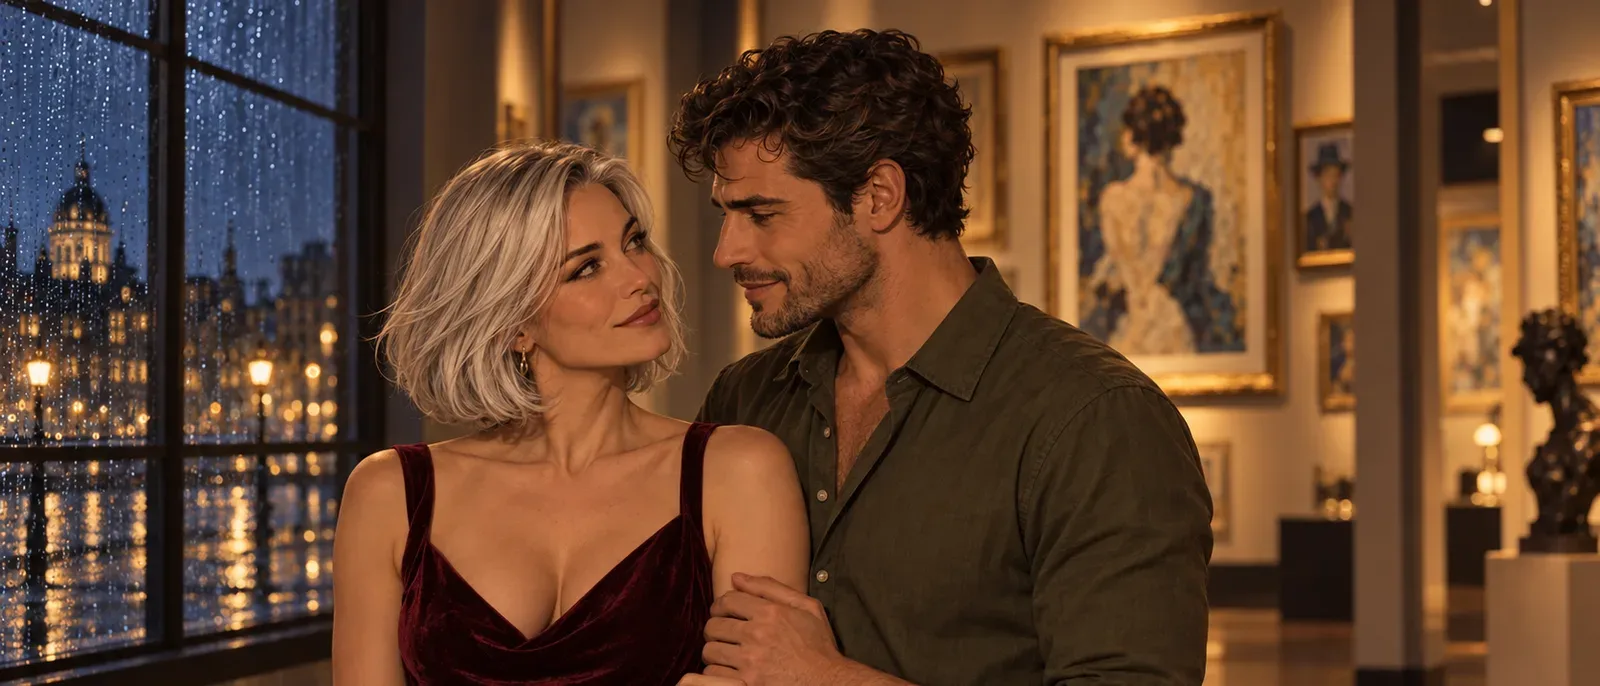
The practical way to make an NSFW AI comic is to draw its panels separately, reuse approved character references, and add dialogue in a layout editor after the artwork works. A whole-page generation can help you discover a composition, but it is a fragile master when one face, gesture or sentence needs replacing. Start with a six-panel scene, not an entire chapter.
For anime artwork, Anima Turbo is an inexpensive place to develop the look. For requests that need separate character references or a specific revision, use an instruction-based editor such as Qwen Image 2.1 or Seedream 5.0 Pro. Those are different jobs: a model that creates appealing characters does not automatically remember their faces in the next panel.
This guide builds one proposed page about two fictional adults meeting after an exhibition closes. The mood is mature and romantic; everyone remains clothed. The example is a production plan, not a completed model comparison. You can use the same method for an adult subscription comic, a visual novel interlude or a short relationship story without turning every panel into another posed portrait.
Choose a generator for the work you need it to do
A useful comic workflow needs three things: artwork, a way to revise artwork, and page assembly. They can live in one product, but they do not have to. Before buying a comic generator subscription, find out whether its “consistent characters” feature actually uses your references, whether you can regenerate one panel, and whether downloaded pages preserve editable dialogue. A script generator is not the same purchase as six finished illustrations.
The distinction matters in current comic products. Adobe describes creating panels with prompts and references, while Elser separates scripts and storyboards from optional rendered artwork. Those pages explain their own features; they do not establish suitability for your particular adult brief. A generic comic page appearing for an NSFW search is not evidence that it accepts the content you want to make.
For a workflow you can direct yourself, these are useful starting points:
| What you need | Starting point | What changes your decision |
|---|---|---|
| Explore an anime cast and visual finish | Anima Turbo text to image | $0.012 per image at 1k; $0.024 at native 1.5k. Text, tags and a seed; no separate identity-reference input in this task. |
| Use a character or style adapter you already own | Prefect Pony XL LoRA | $0.024 per image; up to three compatible Pony-family SDXL adapters. Text-to-image rather than reference-image editing. |
| Build a new scene from your approved cast references | Qwen Image 2.1 edit | One to ten references with explicit roles. Base price starts at $0.036 at 1k; extra references raise the quote. |
| Revise an image or combine cast and scene sources | Seedream 5.0 Pro edit | One to ten references; $0.036 at 1k or $0.072 at 2k before additional-reference charges. No separate mask input. |
All four tasks in the table are currently classified as unrestricted in SpicyAPI's public catalogue. That describes their listed content scope; it is not a finding that this six-panel sequence has been tested or that every NSFW request will succeed.
These are public USD image prices, not the price of a finished comic page. A completed candidate you decide not to use, a new composition and a final repair are separate outputs if you submit separate generation requests. Use the displayed quote for the actual inputs you attach, especially on reference editing.
Anima's maker describes it as an illustration model, with limited long-text rendering. That makes it a sensible artwork tool rather than a reason to ask it to typeset all six speech balloons. Its hosted image-to-image task takes one source and a strength value: it redraws from that source, and is not equivalent to an instruction editor with several assigned references. The publisher's model card also distinguishes the fast Turbo build from the other versions; local sampling advice does not create extra controls in a hosted form.
For this example, the simplest route is to develop the cast in your preferred illustration model, approve the references, then create the six scenes with one reference editor and one consistent finish. Do not change models halfway through because a single portrait looks more attractive elsewhere. A sharper face is not worth an unexpected change in line weight, eyes or clothing across the page.
Give the page an event, not just a mood
“Two adults in a romantic gallery” describes a picture. A comic needs something to change. Our page, The Last Sketch, begins with Mara preparing to leave. Elias reveals that the final sketch in his book is of her. She decides to stay for a conversation. The romantic development is visible through attention, distance and a choice; it does not depend on the reader being told that every panel is “sensual.”
Mara is a fictional 34-year-old illustrator: silver chin-length bob, amber eyes, long adult face, burgundy opaque satin camisole, black tailored blazer and dark trousers. Elias is a fictional 36-year-old gallery owner: short dark curls, light stubble, an olive open-collar shirt over an opaque cream vest and black trousers. They have distinctive silhouettes without an elaborate costume inventory.
The gallery contains a rain-streaked window on the left, an oak table on the right and a closed entrance behind them. A brass lamp stays on the table. There is one closed tan sketchbook at first. Mara has a black shoulder bag. These details are enough to track the event; adding six sculptures, three mirrors and a crowd creates work without improving this story.
Write the sequence before you generate:
| Panel | What the reader sees | What changes | Proposed dialogue |
|---|---|---|---|
| 1 | A wide gallery view. Mara stands left with her bag on her shoulder; Elias stands right beside the table. | She is about to leave. | Mara: “I should let you close.” |
| 2 | Mara in three-quarter close-up, looking right. A corner of the table enters the frame. | Something makes her pause. | Elias, off-panel: “One thing before you go.” |
| 3 | Elias in three-quarter view, looking left, opening the tan sketchbook on the table. | He reveals what he kept back. | Elias: “I never finished the last sketch.” |
| 4 | A close insert of the open book and a simple portrait drawing of Mara. His olive cuff is visible beside it. | The reader understands the invitation. | No dialogue. |
| 5 | Both adults at the table, Mara left and Elias right. Her bag rests on the floor beside her chair. | She chooses to sit, and their distance closes. | Mara: “Then perhaps I should stay.” |
| 6 | A closer two-shot. They look at each other over the open book, with the warm lamp behind Elias. | The formal goodbye becomes a private conversation. | Elias: “I was hoping you would.” |
Each panel has a different function: setting, reaction, action, reveal, response and payoff. That is why six panels earn their space. Six flattering waist-up shots with slightly different smiles would not tell the same story, even if every face matched perfectly.
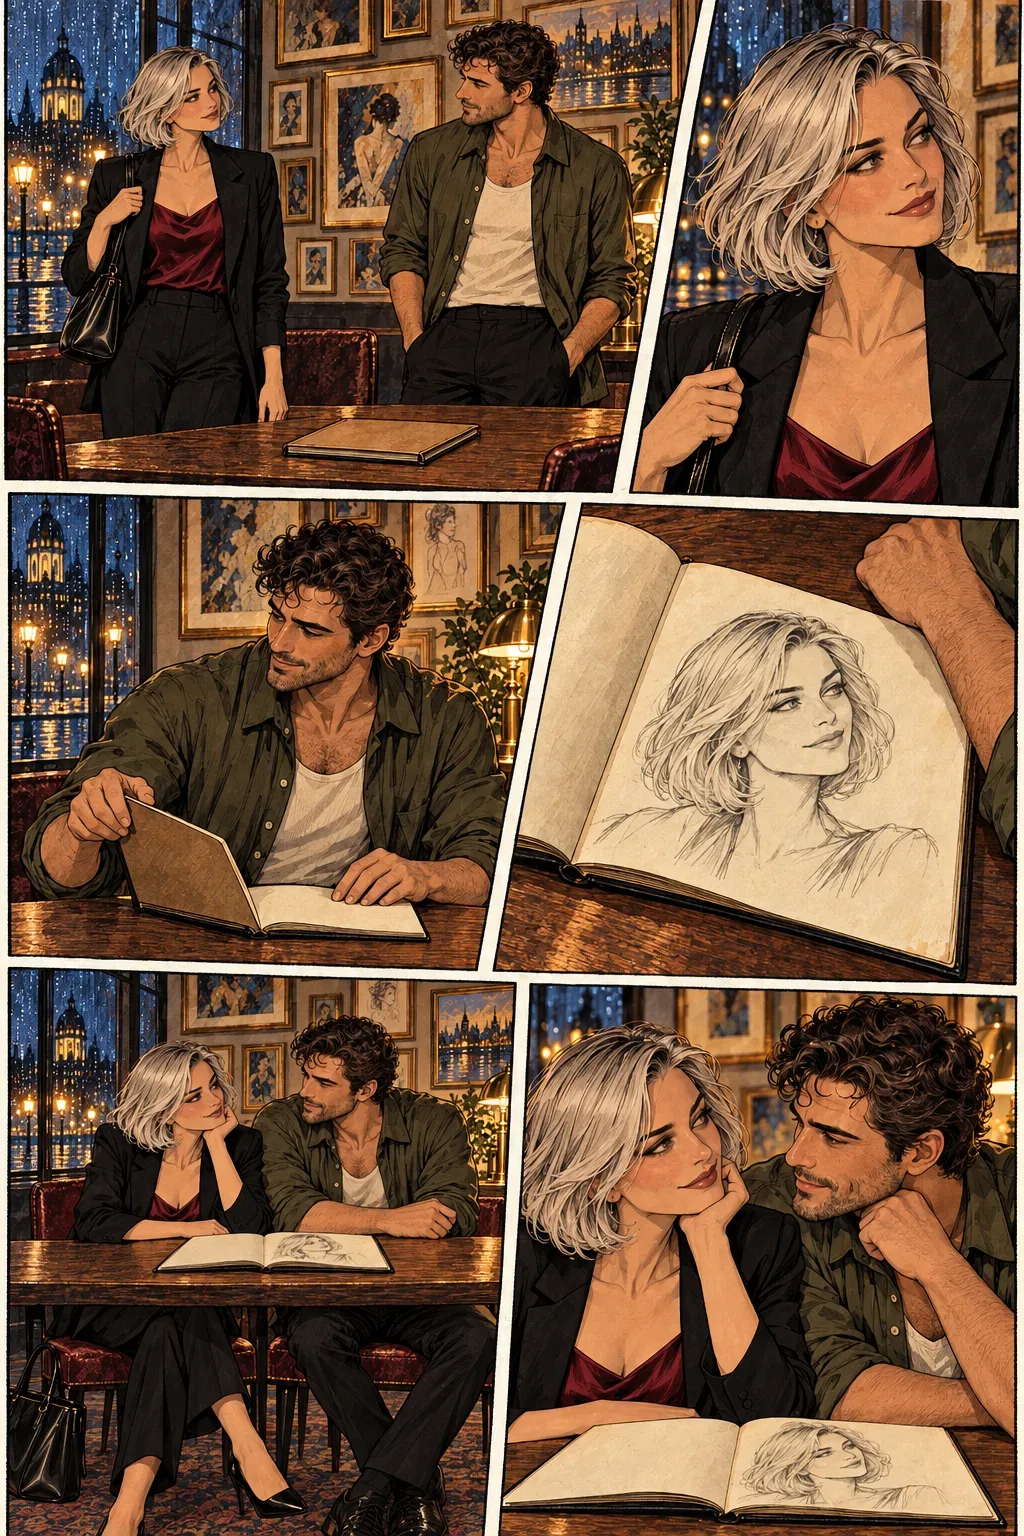
Illustration: six distinct moments move from a goodbye to a shared conversation.
The insert is particularly useful. It gives the reader a pause between his reveal and her reply, and it can carry meaning without another difficult face. However, the sketch must actually resemble Mara. A generic drawing of a long-haired woman undermines the story. If the model struggles with a drawing inside an illustration, place a simplified approved portrait into the book yourself during compositing, matching its perspective and paper texture.
Do not ask a single panel to contain the entire action: opening the book, pointing, Mara sitting and both leaning closer. A still image has one readable moment. Panel three shows the book being opened; panel four shows what is inside; panel five shows her decision. Splitting those moments makes both generation and reading easier.
You can change the pair, but keep the event. Two men can use the same reveal-and-response structure, as can two women. Rewrite the individual descriptions and clothing ownership, then keep the staging clear. The story depends on each adult recognizing an invitation and choosing a response, not on a particular pairing.
Approve the cast before building the room
Generate Mara and Elias separately first. Use a neutral waist-up view, both eyes readable and hands outside the face area. The reference should show the hairstyle, jaw, shoulders and clothing that will matter on the page. A dramatic overhead portrait with hair across one eye may be an attractive cover, but it is a poor source for deciding what the hidden side of the face looks like.
For Mara, a reference brief could be:
One fictional adult woman, Mara, age 34. Silver chin-length bob with a side part, amber eyes, long mature face, understated smile lines. Burgundy opaque satin camisole under a black tailored blazer, dark trousers. Neutral waist-up three-quarter portrait, both eyes clear, hands lowered and outside the face. Contemporary mature romance illustration, clean ink contours, restrained cel shading, burgundy and olive accents, warm neutral background. No lettering or additional person.
For Elias, use the same finish and lighting simplicity, but describe his own features and outfit. Do not generate him by editing Mara into a man if that imports her face shape or silver hairstyle. The two sources should establish two distinct people before you ask the editor to place them together.
Choose each reference for recognition, not only attractiveness. Mara's bob must stop at the same place relative to her jaw. Elias's curl pattern and beard coverage should be easy to see. A tiny decorative mark can help at close range, but it will not survive every wide shot. The broad face shape, hair outline and overall build matter more to a person reading quickly.
Next create one approved pair view with a visible gap between their bodies. Mara stands left; Elias stands right. Their hands stay apart. This reveals whether the selected editor can combine the two identities without giving both people the same eyes or trading their jackets. If the pair is wrong, fix it now: every later scene would otherwise inherit the confusion.
For that first combined frame, attach Mara first and Elias second. Write the assignment at the beginning:
First reference supplies Mara's facial identity, silver bob and burgundy-and-black outfit. Second reference supplies Elias's facial identity, dark curls and olive-and-cream outfit. Show exactly these two fictional adults, Mara on viewer-left and Elias on viewer-right, standing at similar depth in a simple gallery. Both faces visible, shoulders separated, hands at their own sides. Retain the illustration finish of the references. No text.
This is a composition proof, not necessarily panel one. Its job is to establish that the pair remains distinct. Save it beside the individual portraits, but do not replace the originals. An approved pair helps with relative height and clothing ownership; the individual images remain clearer face sources.
One extra angle is useful if your storyboard needs it. Mara's three-quarter view is already enough for panels two and five. If panel six needs Elias in a stronger side view, generate and approve that angle before the page. A generated profile that changes his nose is a failed candidate, not an additional canonical face.
Avoid a giant reference sheet containing twelve versions of each person. If three of Mara's faces disagree, the editor has three competing instructions. Make a readable contact sheet for your own review, then attach the clean individual images needed for the request. Our character reference guide covers the source kit itself; the next step here is making those sources serve a continuous page.
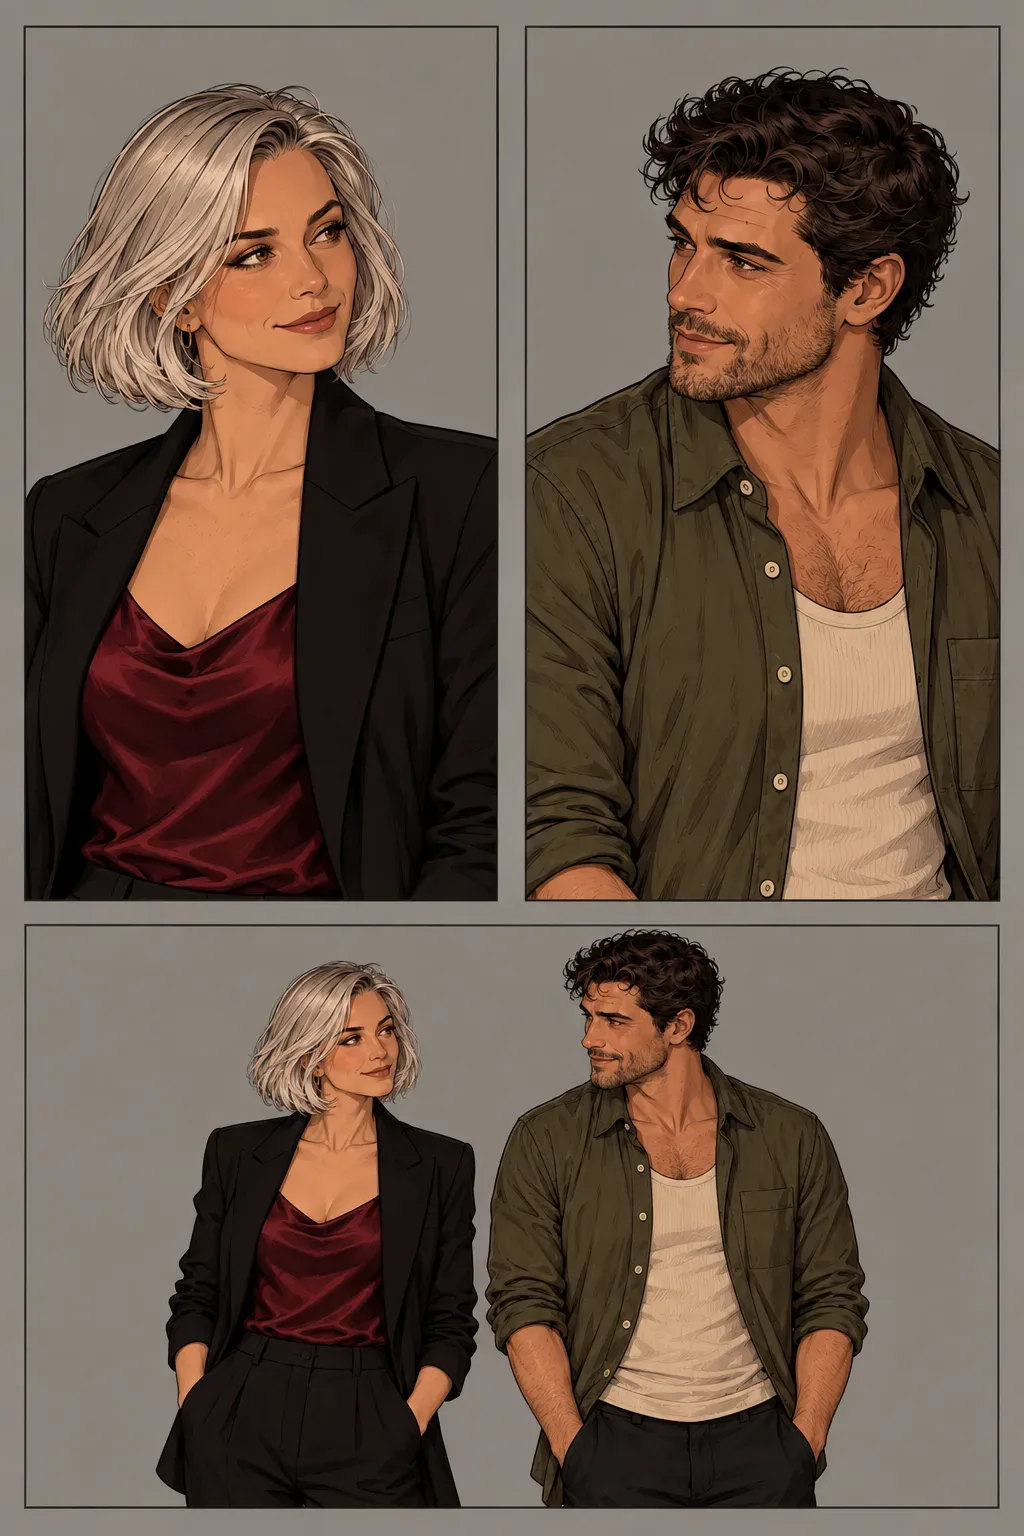
Illustration: approve the individual cast before combining them.
Keep the gallery and the reading direction stable
Character consistency includes more than facial identity. A reader may overlook a slightly different nose, then immediately notice that Mara's bag moved from her shoulder to Elias's arm without explanation. The room, wardrobe and object states help the cast feel like the same people in the same evening.
For the first page, keep the camera on one side of the imaginary line between Mara and Elias. Mara appears left and looks right; Elias appears right and looks left. Their close-ups should face toward each other. If both look right in consecutive reaction shots, the page can imply that they are watching someone else. This is a staging recommendation for this scene, not a technical identity feature of the model.
You can move the camera closer and lower without reversing that relationship. In panel two, Mara's shoulders may be angled away from the table while her eyes turn back toward Elias. In panel three, his shoulders remain near the table while his head turns toward her. Describe both gaze and torso direction when they differ. “Looking at him” alone may produce a frontal camera gaze because the editor cannot see your written storyboard.
Reserve a little empty space above the speakers. Panel one needs room for Mara's short line; panel three needs room near Elias; panel five needs room over Mara. Do not generate a tall lamp directly behind the future balloon location if it is the important landmark connecting the shots. A balloon that covers the lamp removes your continuity cue.
The props have a simple state sequence. Mara's bag is on her shoulder through panel two, out of the crop in panels three and four, and beside her chair in panel five. The sketchbook is closed in panel one, opening in panel three and open thereafter. The lamp stays lit throughout. If the book is closed again in the final shot, either repair it or change the story to show a deliberate closing action.
Use the accepted wide gallery view as an environment source when a new composition needs its geometry. Assign it only to the room, table and lamp. If that source includes the pair, explain that the separate portraits define identity and the wide image defines spatial arrangement. Better still, prepare an empty room version if the existing people repeatedly intrude into close-ups.
You do not have to reproduce every wall painting. Keep the landmarks that orient the scene and simplify the rest. A close-up can show a soft olive wall and the edge of the oak table; it does not need the full gallery behind the head. That gives the model fewer details to invent and makes the reaction more prominent.
A page can intentionally cross the line or change clothing, but it needs to show the transition. For this first six-panel exercise, there is no benefit in asking the reader to infer a room change, a jacket removal and a camera reversal simultaneously. Mature tension is already present in the hesitation, the invitation and the reduced distance.
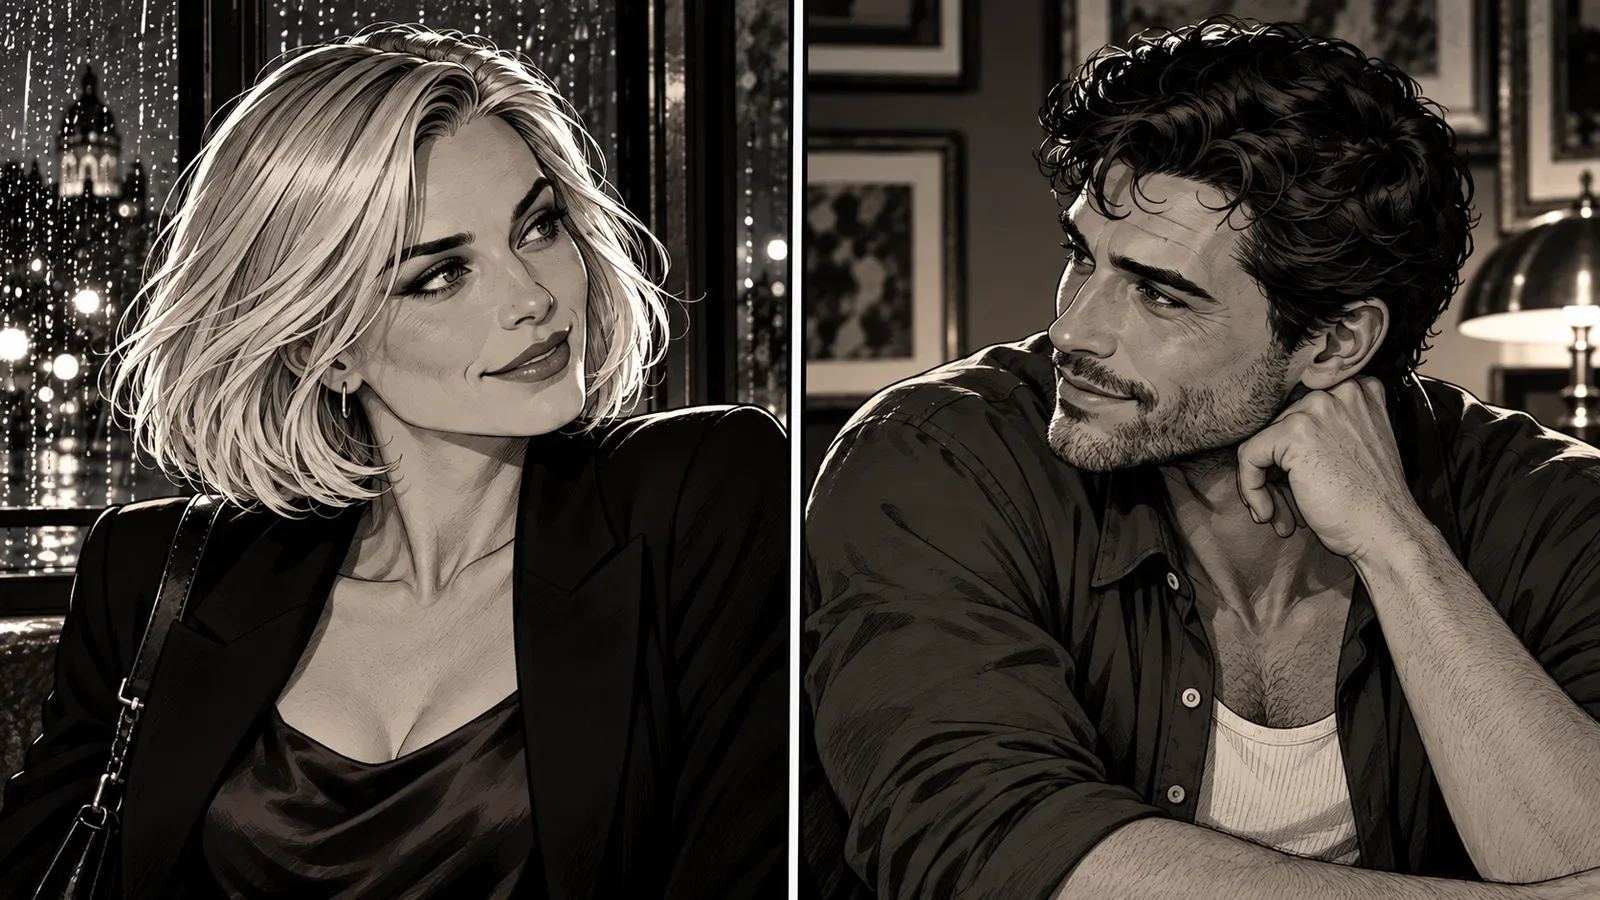
Illustration: opposing eyelines connect the two reaction shots.
Generate the hardest relationship shot first
Although panel one comes first in the story, panel five is the most useful early generation. It contains both recognizable adults seated together, the open book, Mara's bag and the gallery lighting. If that composition cannot work, the page needs a simpler plan before you spend on all the solo shots.
In Qwen Image 2.1 editing, attach Mara's approved portrait first, Elias's second and the room third only if it contributes something the prompt cannot describe. Start at 1k, with a landscape ratio such as 3:2, opaque background, PNG output and prompt expansion off. The current form accepts one to ten images, but more inputs are not automatically better. Additional references also change the price.
Use a continuous instruction that names the references and the moment:
Reference one defines Mara, age 34, with her silver bob, amber eyes, burgundy camisole and black blazer. Reference two defines Elias, age 36, with dark curls, light stubble, olive open-collar shirt and cream vest. Reference three supplies only the gallery, oak table and brass lamp. Create one landscape comic panel in the same mature romance illustration finish. Mara sits on viewer-left and Elias sits on viewer-right at the oak table, at similar distance from the camera. One tan sketchbook lies open between them. Mara's black bag rests beside her chair. They exchange a restrained, interested glance; each person's hands remain on their own side of the table. Warm lamp light from the right, rainy window at the left edge. Leave quiet wall space above Mara for later dialogue. No balloons, lettering or extra people.
If you attach only two portraits, remove the third-reference sentence. Do not leave a request assigning a nonexistent source. Likewise, if your environment source places the window differently, either use its arrangement consistently or revise the reference. Contradictory room instructions make it harder to know what a “correct” result should be.
Approve the pair, the book and the seating before seeking more dramatic expressions. A subtle glance with clear identities works better than a persuasive smile on a different face. For this page, the hands do not need to meet. Leaving them separate still communicates closeness and keeps the reader's attention on the reply.
Once panel five works, build panel one from the same cast and room roles, changing only the visible state: both standing, bag on Mara's shoulder, closed book on the table. Build panel six from the accepted seated scene plus the identity sources needed by the editor. Ask for a closer crop and mutual eye contact, retaining outfits, book and lamp. If it changes the cast, return to the original portraits rather than accepting that final face as the new identity.
For Seedream 5.0 Pro editing, the same reference roles are useful, but set its own fields: one to ten images, an explicit aspect ratio instead of leaving portrait-based auto framing, opaque background and PNG. Its 1k and 2k tiers have different prices. It has no separate mask field, so a written regional correction is not the same operation as Qwen's masked mode.
Do not transfer an Anima strength value into either reference editor. The forms represent different operations. Anima can redraw one supplied picture into illustration, but increasing strength to escape the original composition can also move away from the identity information you wanted to keep. For new camera angles with separately assigned cast, the reference editor is the more direct starting route in this proposed workflow.
Make the close-ups do different jobs
Panel two should not be a beauty card. Mara has stopped leaving because she hears Elias. Keep the black strap at her shoulder so the image belongs to the moment before she sits. Ask for a three-quarter view facing right, eyes just off-camera, lips relaxed and a slight pause in her movement. An exaggerated blush or astonished open mouth would change the tone from understated adult attraction to a different story.
Panel three should show intent through an action: Elias opens the sketchbook. If the hand-and-book arrangement is too complex, make the book already open and show his hand resting beside it. The following insert still communicates the reveal. You lose a literal opening motion, but keep the important sequence without accepting an impossible wrist.
For panel four, generate the close insert from the accepted book state or assemble it manually. Use a simple line portrait, not another full rendered face inside the book. The page needs readers to recognize silver bob and long face, not inspect an elaborate picture-within-a-picture. Place Elias's olive cuff beside the lower-right book corner, with his hand outside the drawing area. Avoid overlapping fingers across Mara's illustrated face.
Camera distance can change facial appearance without changing identity. In the wide panel, Mara's eyes are a small pair of color marks; in the close-up, the iris and lids are visible. Review broad shape at comparable crops rather than demanding that every highlight match. Conversely, a long silver bob becoming dark shoulder-length hair is not a camera effect.
The wardrobe should behave like actual material. The burgundy camisole may have different folds as Mara sits, and the blazer's lapel can shift with her shoulders. Its color, neckline construction and presence should remain. Reject an unexplained switch to a red dress or a blazer that migrates to Elias. A style prompt repeating “satin” everywhere can also make his cotton shirt glossy; tie the material to its owner.
This is where community examples are instructive. In a comic consistency discussion, a promotional claim of zero drift received a reply pointing out altered eyes, hair and trousers. That is one discussion, not a measured failure rate, but it illustrates why a creator's declaration of consistency is not enough. Inspect the page as a reader would, with neighboring panels visible together.
After each new close-up, place it beside panel five in the layout. If the solo image looks like a different art director made it, correct its finish now. Use the same contour thickness, shadow treatment and palette. Do not attempt to hide a style mismatch under a warm color filter if the face rendering changed from flat anime to a dimensional painted portrait.
Whole-page generation: useful draft, costly master
A whole-page request is appealing because it produces panels, characters and text at once. For a quick idea sheet, that can be useful. You can inspect where a wide shot belongs or whether the final reaction needs a larger frame. But a rendered page is often one flattened image, so improving one balloon or one face can reopen every other decision.
For a storyboard request, say that you want six rough panels, simple figures and empty balloon space. Describe the event in the same order as the table. Treat the result as a proposal to redraw, not as the source of your cast identity. If it changes Mara between panels, use it for framing only. A small rough layout does not need to pass the same face review as the final art.
Pixel allocation is another reason to create final panels separately. A 1536-pixel-wide page with two columns leaves each panel less than half that width after margins and gutters. Three rows divide the available height again. A face occupying a small part of one panel gets much less information than a separately generated medium shot at the same nominal tier. Upscaling the finished page cannot recover a correctly drawn hand that was never there.
Independent panels also let you compare story options cheaply. Swap a silent insert for a reaction shot without regenerating five accepted illustrations. Enlarge panel six in the layout to emphasize the payoff. Move a balloon without changing the eyebrow behind it. Those are editorial decisions best made with editable pieces.
A dedicated comic application may handle this separation for you. If it stores cast references, provides individual panel regeneration and exports editable text, you can use that structure instead of manually moving files. Ask what its export includes before committing to a chapter. A screenshot of a finished page does not tell you whether the next revision requires a complete redraw.
For our six-panel page, final panels are individual images. The page document owns borders, spacing and typography. This division lets you judge “is Elias recognizable?” independently of “does his line fit the balloon?” and finish both without spending a new image request for every wording change.
Repair the failed part instead of restarting the page
When a candidate is wrong, name the failure. “Make it more consistent” leaves the model to decide whether you mean the face, clothes, room or drawing style. If the face is already correct, a broad request can damage the one part you intended to keep.
Mara's hair changes in panel two. Return to her original approved reference, not the latest pretty close-up. Ask for the chin-length silver bob and side part while retaining the existing pose and expression. If several later panels contain the wrong hair, do not use them as additional identity sources. Otherwise the correction is competing with its own mistake.
Elias wears Mara's burgundy top. This is clothing ownership, not an identity problem. Edit the accepted pair and identify the person by appearance and position: the dark-haired adult man on viewer-right wears the olive shirt over the cream vest; the silver-haired woman on viewer-left retains burgundy and black. If faces are distinct, there is no reason to recast both from text.
The table reverses between reaction shots. Decide whether the geography is actually confusing before paying for a change. A close-up with no landmarks may be usable; a wide shot showing the window on the wrong side is harder to reconcile. Return to the approved room arrangement and request that the brass lamp remain behind Elias, with the rain window on Mara's side. Do not horizontally flip a panel if that reverses an asymmetric hairstyle or the book drawing.
The book grows a second cover or extra pages. Repair the object as one tan sketchbook, open flat, with a visible spine and two facing pages. Give the hand a simple location outside the spine. If the image is an insert, there is often no need to regenerate a character face to solve the book geometry.
A cuff connects to the wrong hand. Trace the sleeve through the wrist before judging the fingertips. A plausible hand attached to the other adult is still wrong. For panel five, simplify the pose to each person resting their hands separately. For panel three, make the hand rest beside the open book rather than gripping a page mid-turn.
The final shot becomes a pose for the viewer. Specify mutual attention: Mara looks toward Elias on the right, Elias looks toward Mara on the left, neither looks into the camera. Describe the eye-line rather than adding more romance adjectives. The payoff is that they choose each other’s attention, so camera-facing smiles lose the story.
For a local Qwen repair, upload only the accepted panel and its aligned black-and-white mask. White marks the area to repaint; black marks the area to keep. The current masked mode requires exactly one source, works at 1k or 2k, preserves the source shape, and cannot be combined with a transparent background. Do not attach both original cast portraits alongside the panel in this mode.
If panel four has a faulty olive cuff, mark the cuff, wrist connection and a little surrounding paper, not the entire page. A proposed instruction is: “Repair one olive shirt cuff and the adult man's natural wrist beside the lower-right edge of the open tan sketchbook. Keep the drawing, book perspective, table grain and existing light.” A 2k one-source Qwen edit is $0.048 before any account-specific discount. Review the kept region too; an accepted result still needs a visual comparison.
Masks do not solve every problem. If two torsos merge in panel five, the affected structure is too large to treat as a tiny hand repair. Return to the separated composition and redraw that panel. If only a dark border or speck is wrong, an ordinary paint or compositing tool may finish it directly, with no new generative request.
Keep the original panel before each repair. If the new version fixes the cuff but changes Elias's eyes, restore the master and try a narrower intervention. Never overwrite the only good face because another part improved. Our two-character guide expands the anatomy and clothing assignments; on this page, the repair succeeds only when the neighboring panels still make sense.
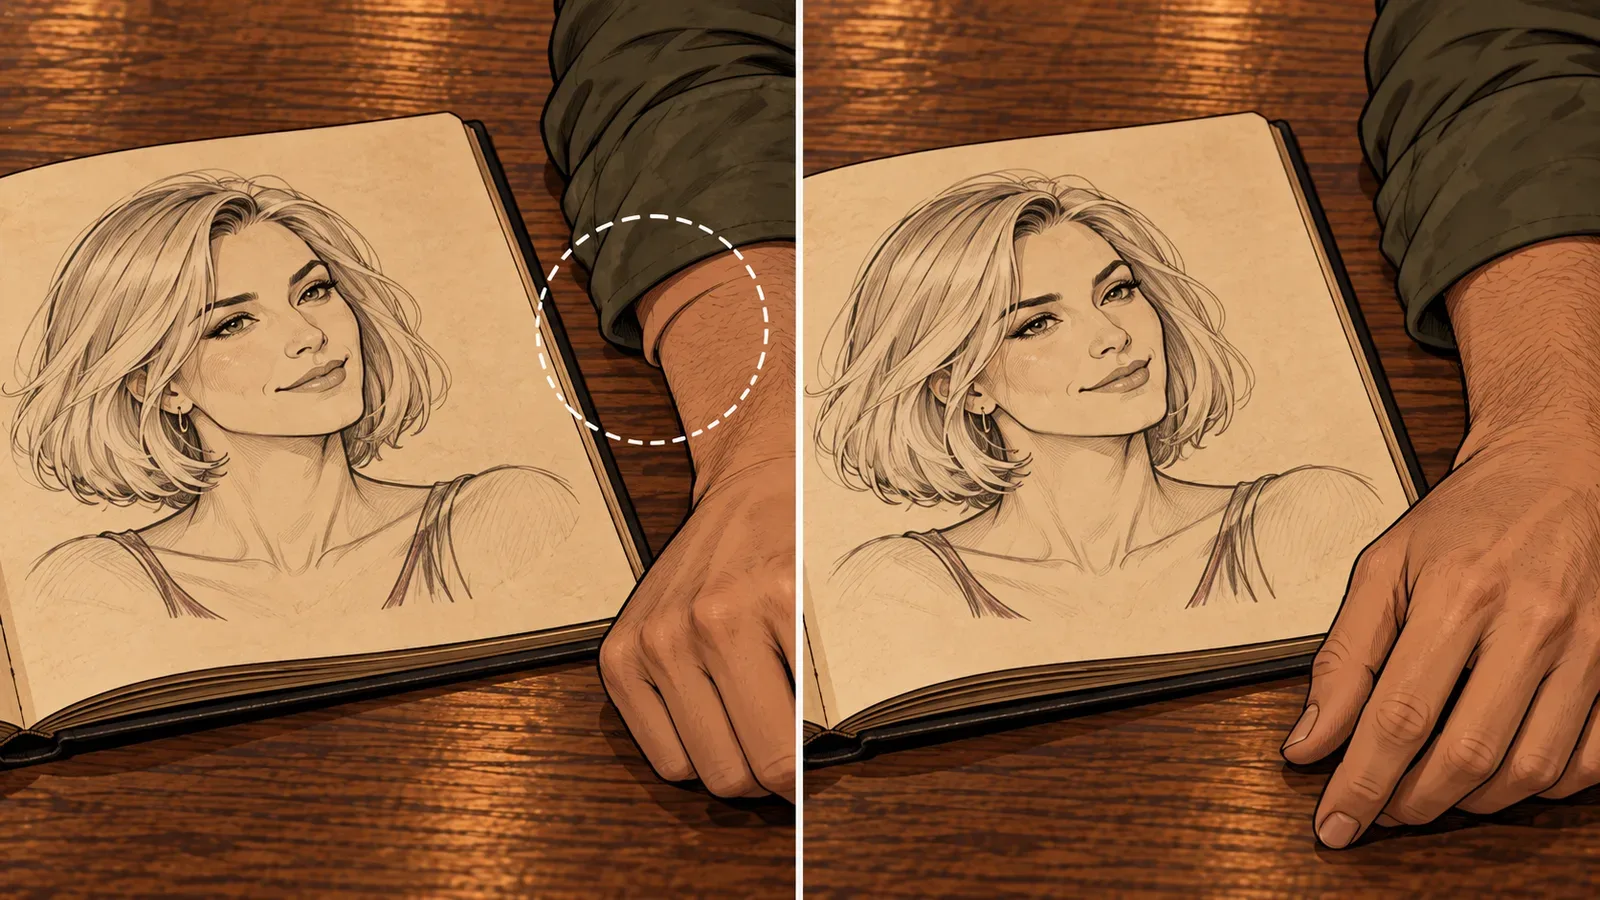
Illustration of a local repair target, not a measured masked-edit result.
Add dialogue where a reader expects it
Put the six art files into a page editor before drawing balloons. Clip Studio Paint, or another editor with editable shapes and text, is enough; the important feature is that dialogue stays separate from art. Clip Studio's official comic tools guide describes frame borders, balloon shapes and balloon tails. Use those to revise placement without regenerating the artwork.
For an English page, begin with left-to-right reading across each row. The first balloon should sit where the eye enters its panel, and the answer should follow it rather than forcing the reader backward. Our page avoids two simultaneous speakers in most panels. That makes the exchange readable and leaves the faces unobstructed.
Panel two is the exception: Elias speaks off-panel while Mara reacts. Place his balloon near the right edge, with a tail suggesting the voice comes from outside that edge. Do not point its tail toward Mara's mouth. If the off-panel convention feels unclear in your layout, move his line into panel one after Mara's goodbye, leaving panel two silent. The art still communicates the pause.
Keep the book insert silent. Adding “It's me!” would repeat what the drawing already shows and flatten the moment. The reader can recognize Mara, then turn to her decision in panel five. Good artwork should carry some of the story without a caption explaining every expression.
The dialogue is deliberately short: a goodbye, a request to wait, a reveal, a decision and a reply. If you want more character voice, alter the wording without adding a paragraph. Mara might say, “You’re still here working?” in a different story, but that changes the reason she pauses. Rewrite the beat as well as the sentence when you change its meaning.
Leave breathing space inside balloons and around faces. Letterer Nate Piekos's comic lettering conventions discuss tails pointing toward the speaker's mouth and avoiding awkward near-touches between balloons and art. For our layout, keep a clear gap between Mara's hair contour and her balloon. A balloon almost touching the bob looks like an accidental attachment, especially on a phone.
Choose an easy-to-read font with a license appropriate to your use. Do not use a delicate script merely because the scene is romantic. The writing must remain legible at the intended display width. Read the page at that size: if you zoom in to decipher every sentence, shorten the dialogue, enlarge its type or change the layout.
Keep sound effects and captions restrained. Rain can be visible through the window; a giant effect across every panel distracts from the conversation. One small opening caption, “After the exhibition,” may help if the wider story needs it. It should establish time, not explain that both characters are adults or restate their appearance.
Save a text-free art version alongside the lettered page. That makes translation, preview crops and later dialogue changes practical. If you burn English sentences into all six generated images, you make every localization an image repair. Editable balloons let a longer translation change its shape without asking the model to redraw the person underneath.
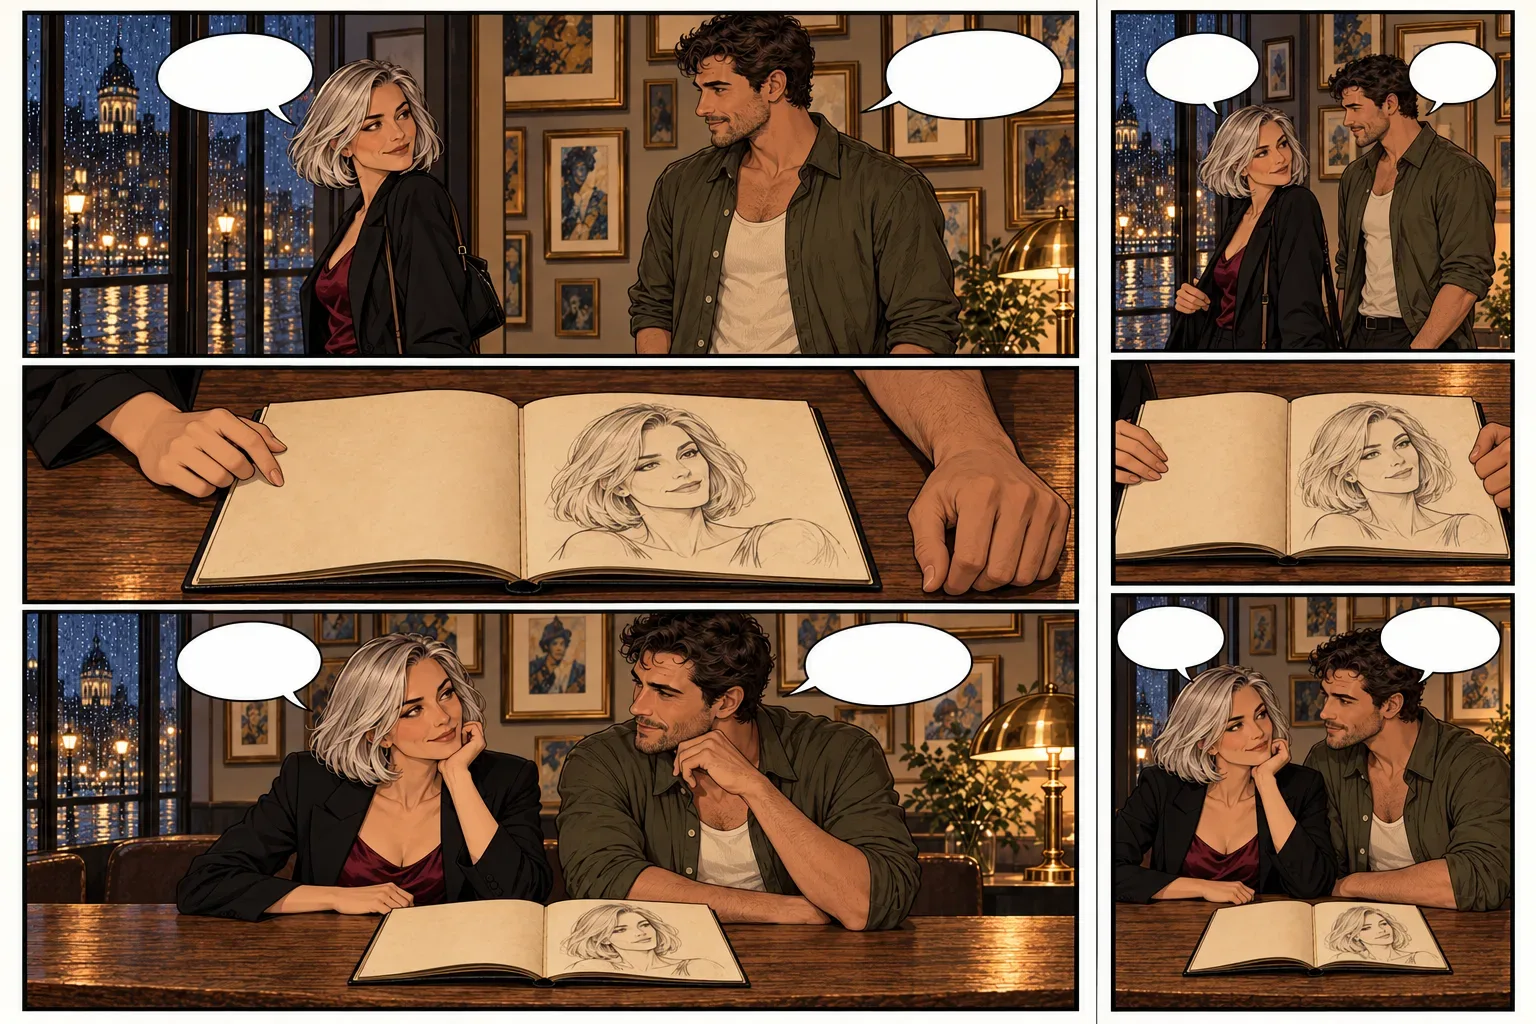
Illustration: artwork, balloons and delivery layout are separate decisions.
Set the page size before you crop the faces
For a simple downloadable digital page, start with a 2400-by-3600-pixel canvas. This is an example working size, not a universal publisher requirement. Give it 120-pixel outer margins, a 60-pixel column gutter and two 60-pixel row gutters. The available panel area is then 2160 pixels wide and 3240 pixels tall. Two equal columns are 1050 pixels wide each; three equal rows are 1080 pixels tall each.
That grid gives six nearly square frames. It is easy to assemble, but it may crop a landscape two-shot. Do not stretch the artwork to fill the cell. Place it behind the frame, scale proportionally and move the crop until both faces, the book and the important hand remain. If that cannot fit, change the grid rather than compressing the adults horizontally.
For this story, a stronger layout may give panel one a full-width strip, use two columns for the reaction and reveal, keep the book insert small, then give the final two-shot more width. A rough page assembled from placeholders will tell you which image ratios you need before generation. The six-panel count does not require six equal boxes.
The faces need room at the final display size. A 2400-pixel file displayed at 800 pixels wide scales every element to one third. A 60-pixel text size in the source becomes about 20 display pixels. That arithmetic is a starting point for inspection, not a font-size guarantee: line length, lettering style and the site's actual display width still affect reading.
Generate art with a little extra room around the subject. Do not place Elias's curls against the top edge if the final frame will crop inward. Keep the book inside the visible area of panel four rather than relying on a page border to conceal a malformed corner. A crop can remove a distraction; it cannot establish an action that has been cut away.
For a vertical mobile edition, stack the panels at a readable width and reconsider their spacing. Do not simply shrink the entire print-style page onto a phone. The silent book insert can have more space before Mara's reply, creating a pause during scrolling. Reposition balloons for each panel if their old placement relies on neighboring frames.
If you intend to print, ask the printer or publisher for trim size, bleed, safe area, color and resolution requirements first. A 6-by-9-inch page at 300 pixels per inch contains 1800 by 2700 pixels before bleed. That is useful arithmetic, not proof that a particular image meets every print specification. Include the required bleed when creating the document, and keep faces, text and crucial hands away from the trim edge.
Export a clean digital page in an appropriate RGB image format and retain the layered document. Clip Studio's export manual distinguishes output pixel dimensions, export range and flattened image exports. Decide whether you are delivering art, a lettered page or a print file; a single flattened preview should not replace your editable source.
PNG is useful for a sharp working handoff, while JPEG or WebP can make a lighter online preview. Inspect compressed line art and balloon text after encoding; aggressive compression may damage the parts readers examine closely. For the web, actual pixel dimensions and readable display size matter more than changing a DPI label.
Budget the page around decisions, not endless rerolls
The first page costs more setup time because you are choosing the cast and finish. Later pages can reuse those decisions, but still need new poses and continuity review. Keep the exploratory phase separate from panel production so you do not pay for six scenes, then decide that you dislike the main character's face.
An illustrative Anima budget is four cast candidates plus twelve panel candidates: sixteen 1k images at $0.012 are $0.192. The same sixteen requests at 1.5k are $0.384. This arithmetic says nothing about how many will be usable; twelve candidates do not guarantee six keepers. It also excludes instruction-based editing, any extra-reference charges and page assembly.
For the reference-editing route, plan the actual inputs per panel. A solo close-up may need one portrait; the shared scene may need both portraits and the room. Use each form's quote rather than multiplying its lowest advertised price across the page. One accepted 2k masked Qwen repair with one source adds $0.048 at the listed rate. A repeated full-frame composition is a different request with a potentially different quote.
Choose what would make you stop rerolling before each request. For panel two, that is Mara recognizable, looking right, with the bag strap retained and room for her reaction. It is not “the most beautiful possible portrait.” For panel four, it is a clear book reveal. When a candidate meets its story function, put it into the page and judge it with the other five.
If three variants fail in the same way, change the problem instead of only the seed. Simplify the hand action, remove a conflicting room source or revise the camera view. A seed can produce alternatives; it does not repair a contradictory brief or create a character-memory system.
Your first finished result should be one readable page with consistent adults, a visible change in their relationship and dialogue you can edit. Once that works, expand the story with the same cast references and a new scene plan. Start from Anima Turbo for the illustration look, or take approved portraits into Qwen Image 2.1 editing for the reference-led panel workflow. Finish the story before multiplying its length.